この記事でわかること!
- Pythonの実行環境を最速で用意できるGoogle colaboratoryのメリットがわかる。
- Pythonの実行環境を最速で用意できるGoogle colaboratoryの初期設定方法がわかる。
目次
超簡単。Python実行環境を『Google colaboratory』で爆速で準備しよう。
Google colaboratoryとは?
Google Driveの拡張機能であるGoogle colaboratory(以下:Google Colab(コラボ))について紹介します。Google Colabなら5分程度の初期設定をすれば、爆速で簡単にPythonスクリプトを実行することができます。
Python初学者こそ「Google colab」を使うべき!
プログラミング初学者の最初で最大の難関である環境構築を避けて通ることができる。
プログラミングを学ぶことの一番のハードルとなるのがプログラミング環境の準備だと思っています。プログラミング実行環境のインストールと設定、エディタの設定、初学者にとってはとても時間がかかる作業です。
 じょじお
じょじお
プログラミングを学ぼうと思った方の多くは、環境構築で挫折するそうです。
 ぽこがみさま
Google colabなら5分程度の簡単な初期設定を行えばその後はどのPCからでもすぐに、Python環境を呼び出すことができます。
Google colaboratoryのメリット!!
Google colaboratoryの良いところ♪
- 無料
- クラウド上のPython環境にブラウザから超絶簡単アクセスできる。
- デバイスによる環境の違いによるエラーに悩まされにくい
- WindowsでもMacでも、OS問わず同じ環境でPythonを実行できる。
- Google Driveと連携してGoogle Drive上のファイルを読み込んだり書き込んだりできる。
- 機械学習などの時間のかかる処理でも、Googleの高性能サーバ上のGPUで動作させることができる。
- Pythonスクリプトを簡単に共有できる。
- 基本的ならライブラリが最初からインストールされている。
Google colaboratoryの利用要件
じょじお
Google colaboratoryを利用するには、Googleアカウントが必要です。個人アカウントでもGoogle Workspace(旧Google Suites)アカウントでもOKです。
Googleアカウントをお持ちでない方はこちらから新規作成しましょう。
(手順1) Google DriveにGoogle colaboratoryをインストールする。
STEP
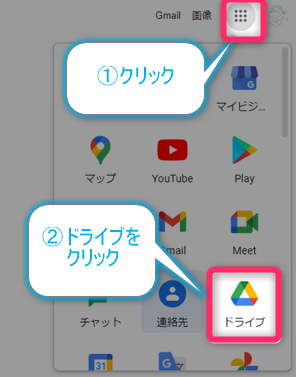
Googleドライブを開きます。
Googleのホームページを開き、メニューアイコンをクリック→ドライブをクリック
▲Google Driveを開きます。
STEP
GoogleドライブにGoogle Colabをインストールします。
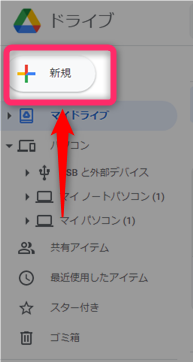
▲「新規」をクリックします。
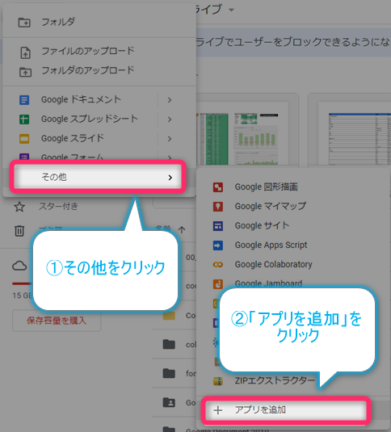
▲「その他」→「アプリを追加」をクリックします。
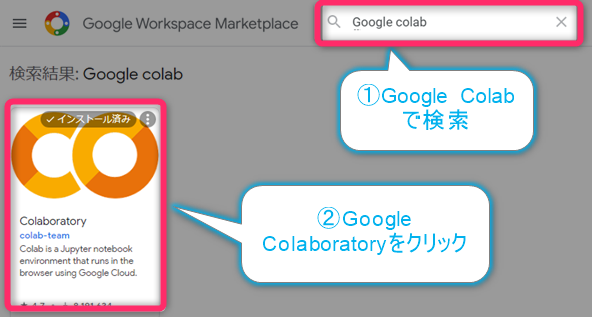
▲「Google Colab」で検索して表示される「Google colaboratory」アプリをクリックして、Googleドライブにインストールします。(画像はインストール済の状態の画像です。)
じょじお
なんと、これだけで初期設定はおわりです。もうPython書けます。
(手順2)Google colaboratoryを使ってみる
ぽこがみさま
STEP
GoogleドライブにGoogle colaboratoryファイルを新規作成します。
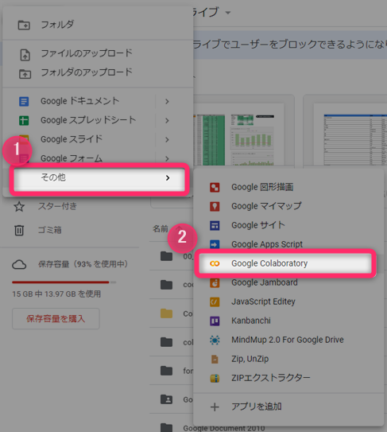
▲Googleドライブ画面の「新規作成」をクリックします。
▲その他→Google colaboratoryをクリックします。
STEP
Google colaboratoryファイルが開きます。
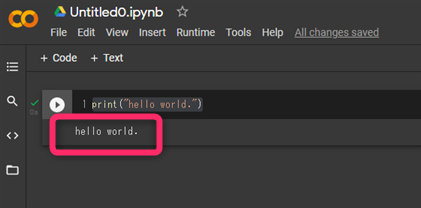
▲「Untitled0.ipynb」というファイルが新規作成され開きます。
図の赤い枠がコードペインです。ここにPythonコードを書いていきます。
STEP
スクリプトを実行します。
▲実行のショートカットキーCtrl+Enterで実行してみます。すると実行結果がコードブロックの下に表示されます。
じょじお
スクリプトを実行することができました。ここからは好きなようにコードを書いて遊んでみてください。
Google colaboratoryファイルの保存場所
STEP
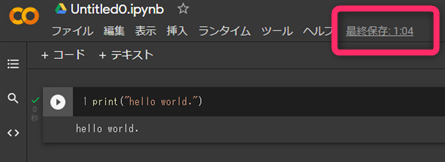
Ctrl+sでファイルを保存します。
▲ファイルを保存してみましょう。保存のショートカットキーはCtrl+Sです。
STEP
保存したファイルを確認んしてみます。
保存に成功すると上図の赤枠のところに保存時間が表示されます。
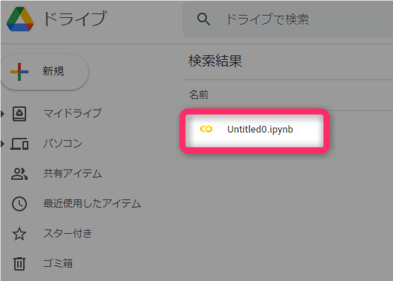
▲Google colaboratoryのファイルは、「ipynb」という拡張子でGoogle Driveに保存されます。
次回このファイルを編集するときは、ダブルクリックして開きます。
Google colaboratoryの使い方について学ぶ
Google colaboratoryはJupyter Notebookというソフトウェアがベースになっています。基本的な使い方はJupyter Notebookの使い方について検索すると良いかと思います。(若干の違いはあります。)
Jupyter Notebookの特徴
Jupyter Notebookの特徴
- セルというブロック単位でpythonコードが実行できる。
- Markdown記法が使える。
PythonでGoogle Driveを操作しよう!
まず最初にやるべきGoogle Driveとの接続方法
じょじお
Google Colabの初期設定が終わったらGoogleドライブと接続しましょう!
ぽこがみさま Google colabでPythonスクリプトを実行する場合、はじめにGoogle ColabとGoogle Driveを接続すると大変便利です。というのも、Google Colabではスクリプトの実行結果をファイルに出力する場合、デフォルトの出力先は仮想ドライブになっているのですぐに削除されてしまいます。Googleドライブに出力することでファイルを保存することができます。
Google ColabとGoogleドライブを接続するメリット!
- Google Driveに保存しているファイルをスクリプトで読み込むことができる。
- スクリプトからGoogle Driveにファイルを書き出すことができる。
じょじお
Googleドライブと接続する方法は下記の記事をご覧ください!
Googleドライブとの接続方法はこちら
【Google colab】GoogleドライブのファイルをPythonで操作する。
Google colaboratoryでGoogleドライブのファイルを操作してみます。 この記事でわかること! Google colaboratoryでローカルPCのファイルを操作する方法がわかる。Googl…
Googleドライブ上のExcelファイルを操作する方法
Googleドライブ上のExcelファイルを操作する。
【Python】Google ColabでGoogleドライブのExcelを操作をしよう!(OpenPyXL)
この記事でわかること! PythonでExcelを操作するためによく使われるOpenPyXLライブラリの使い方がわかる。Google Colaboratoryを使って無料で簡単にOpenPyXLを実行して…
Pythonを学ぶなら
あわせて読みたい
ブロガーにもおすすめの『デイトラPythonコース』の受講後レビュー!
こんにちは、じょじお(@teijilabo)です。 人気の自習型オンラインプログラミングスクール『デイトラ』に新しくPythonコースが登場しました。 すでにデイトラを5コース…
▲Python学習として独学よりデイトラが良かったです。受講レビューをまとめてみましたのでこれからPythonを学ぼうと考えている場合はご覧ください。
デイトラPythonコースのメリット
- SNS(インスタ・Twitter・Youtube等)のAPIを駆使したマーケ特化のモダンなシステムを作りながら学べる。
- 機械学習の基礎を実用的なシステムを作りながら学べる。
- 現役エンジニアがメンター。1年間Slackで質問し放題。
- SlackやTwitterで受講生の発信が盛んなのでひとりでの学習でもモチベ維持しやすい。
- 月に2~4回行われるオンラインセミナー(現役のマーケター・フリーランサー・デザイナー社長・エンジニア等のWeb界隈のすごい人達が講師)が無料で受講可能。
先着1000名まで1万円引きキャンペーン実施中!(8月31日まで)
\買い切りだからコスパ最高・永久にユーザーコミュニティ参加可能/
関連記事
Google colabではgood
あわせて読みたい
【Power Automate for desktop】Python スクリプトの実行
この記事はPower Automate for desktopの「Pythonスクリプトの実行」アクションを検証してみた内容をまとめたものです。 【Pythonスクリプトの実行アクションについて】…
あわせて読みたい
【2021年】PythonでGoogleスプレッドシートに書き込みする方法
【Pythonでスプレッドシートに書き込む方法(Spread Sheet)】 Pythonからスプレッドシートにアクセスするには、下記の2点の準備が必要です。この記事では下記設定手順…
あわせて読みたい
【機械学習】Python Pandas データ前処理について初心者向けに解説します。
この記事はデータの「前処理」で良く使うPandasのメソッドついての解説です。半分備忘録なので見づらいようでしたらすみません。随時更新しています! 【データの前処理…
さいごに
じょじお
以上、Google colaboratoryのはじめかたについて、ご紹介しました。
ぽこがみさま
次回は、より便利に使うためにGoogle DriveをマウントしてGoogle Drive内のファイルをPythonで扱う方法をご紹介します。
Pythonおすすめ書籍
 ポチップ
ポチップ
▲Python入門者向けの書籍です。デスクワークの業務効率化方面を中心に自動化するスクリプトを作成することができます。Excel・Word・PDF・デスクトップアプリ化・メールなどなど。身近な作業を自動化しながら学べるので事務員の方やエンジニアの方幅広くお勧めできます。
リンク
▲Pythonでデータ分析するのに超絶おすすめです。データ分析でよく使うPandasモジュールを中心にデータ加工から分析までの基礎を理解できます。
リンク
▲Pythonのお作法なんかが書かれています。