ガチなシャツ
リライブシャツすごすぎワロタwwwwww【リライブシャツを買ってみたらガチだった。】 リライブシャツ 着るだけで「身体機能をサポートする」怪しいシャツがガチだった。 YouTubeやSNSでバズってた「リライブ...

この記事でわかること。
 じょじお
じょじお以前の記事でExcelをメールに添付する方法を紹介しました。しかし、メール本文にExcelの表データを挿入したいときもあるかと思います。
 ぽこがみさま
この記事ではその方法についてご紹介します。

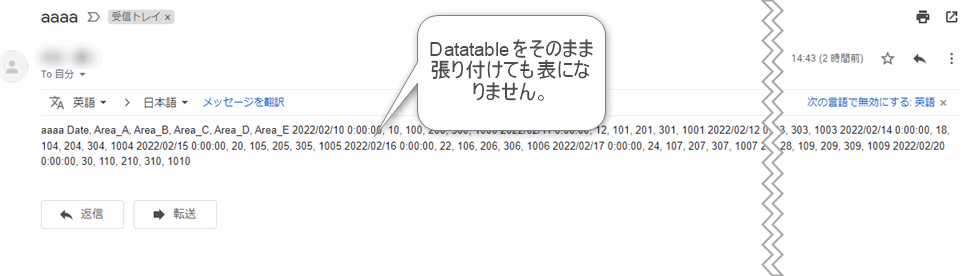
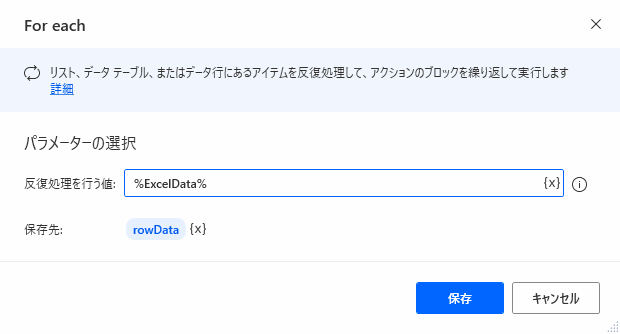
▲Power Automate DatatableでExcelを読み込むとDatatable型の変数が生成されます。まず思いつくのはDatatableを直接メール本文に挿入する方法ですが、この方法では表組みにはなりません。もちろんHTML形式のメールとして送信しています。
一つの方法として、Datatableデータをもとに、HTMLタグを使ってHTMLテーブルを表現する方法を思いつきました。HTMLテーブルは下図のように<table>タグなどを使って表現します。

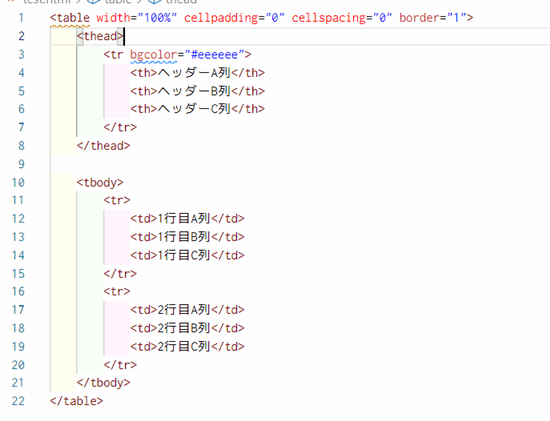
<table width="50%" cellpadding="0" cellspacing="0" border="1">
    <thead>
        <tr bgcolor="#eeeeee">
            <th>ヘッダーA列</th>
            <th>ヘッダーB列</th>
            <th>ヘッダーC列</th>
        </tr>
    </thead>

    <tbody>
        <tr>
            <td>1行目A列</td>
            <td>1行目B列</td>
            <td>1行目C列</td>
        </tr>
        <tr>
            <td>2行目A列</td>
            <td>2行目B列</td>
            <td>2行目C列</td>
        </tr>
    </tbody>
</table>
HTMLわからないという方は下記のサルワカさんの記事がわかりやすいです。HTMLを全部理解するのは大変ですが下記の記事だけ読めばとりあえずHTMLで表組する方法はなんとなくわかるかと思います。

 じょじお
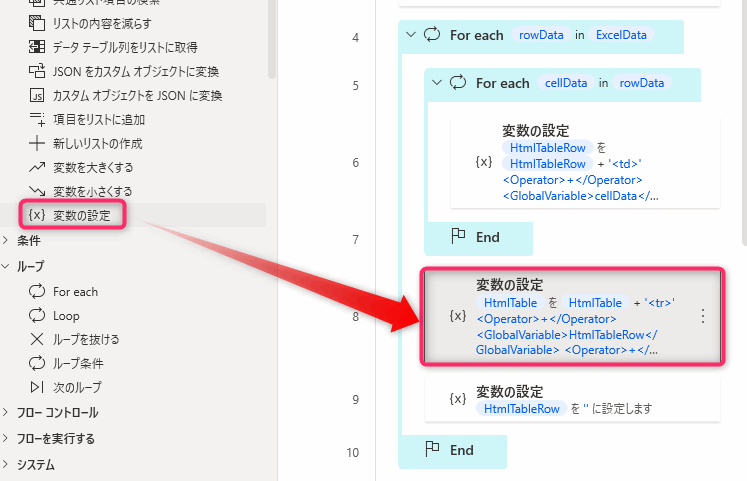
じょじお図は作成するフローの完成図です。使用したアクションは16個です。


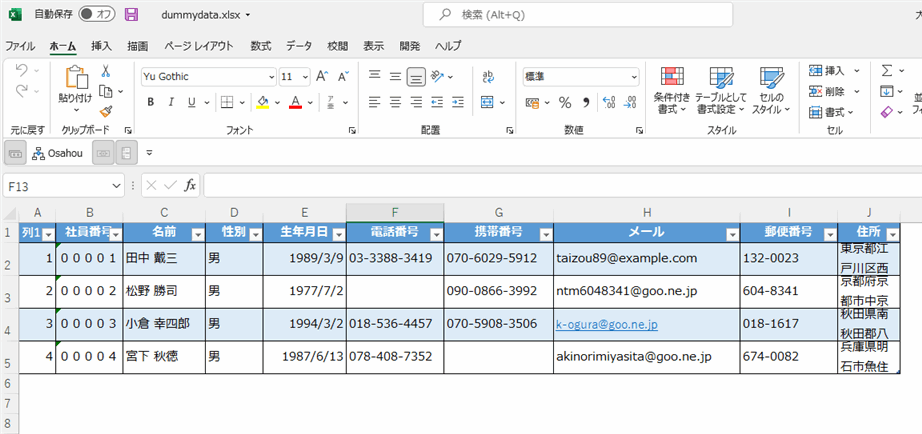
今回使用するのはこちらのダミーデータが表形式で記録されたExcelデータです。この表をメール本文に挿入してメール送信することを今回のゴールとします。
▲Excelを読み込む際のおきまりのアクションを追加します。(3行目まで)
個々のアクションの詳しい解説は下記の記事で紹介していますのでよくわからない方はそちらをご覧ください。
このアクションを挿入すると「End」アクションも自動的に挿入されます。

このアクションを挿入すると「End」アクションも自動的に挿入されます。
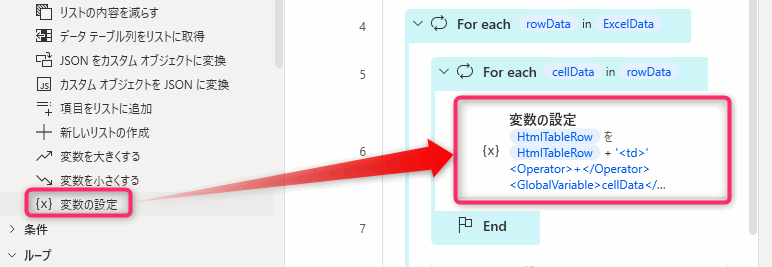
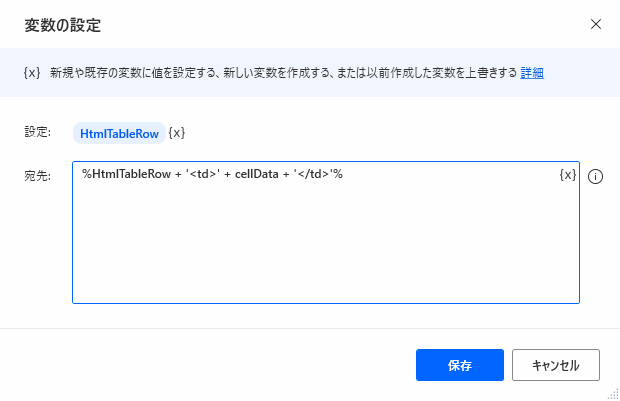
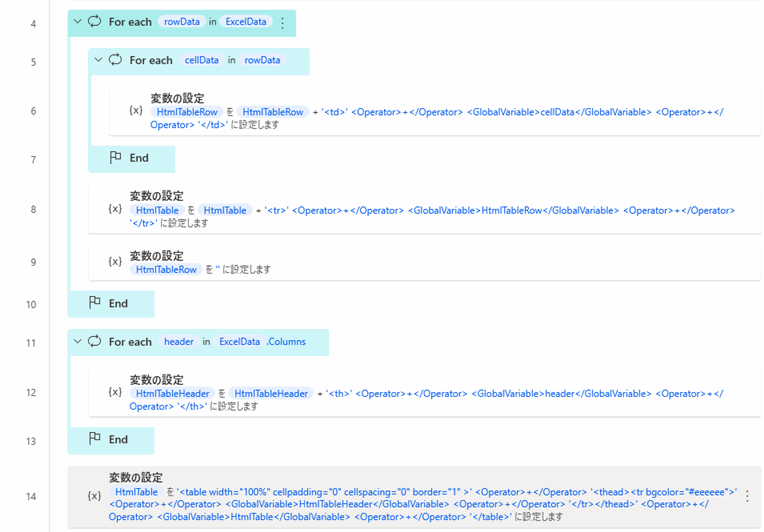
%HtmlTableRow + '<td>' + cellData + '</td>'%
じょじおすべてのセルのデータを「<td>セルデータ</td>」のようにtdタグを付けてます。
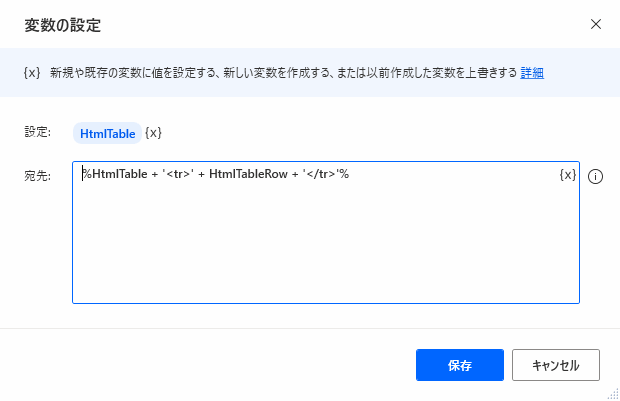
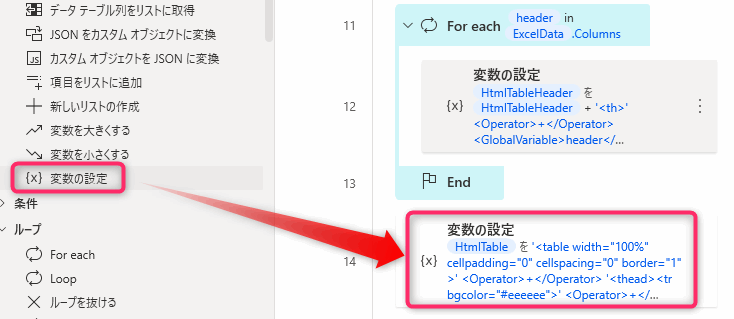
%HtmlTable + '<tr>' + HtmlTableRow + '</tr>'%
じょじお行ごとのデータに「<tr>セルデータ</tr>」のようにtrタグを付けてます。

 じょじお
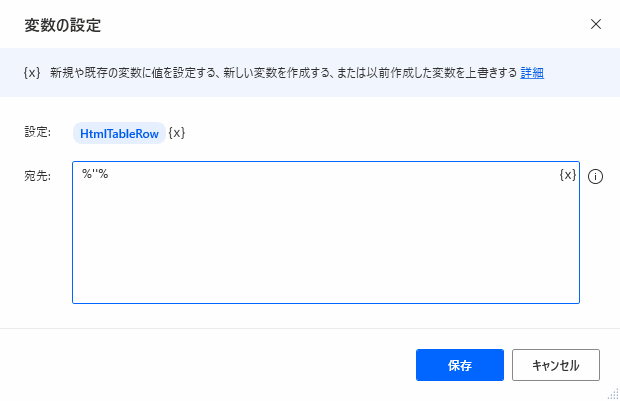
じょじお行データを入れる変数HtmlTableRowを1行ごと処理がおわるごとに一旦空っぽにしてます。%%で””(空文字列)を囲んで挿入すると空っぽにできます。
 じょじお
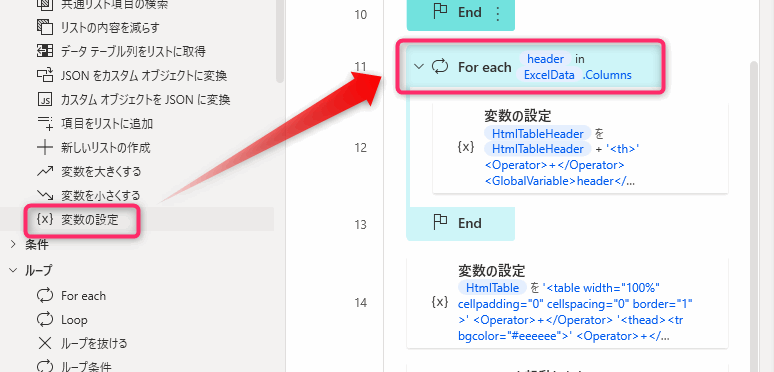
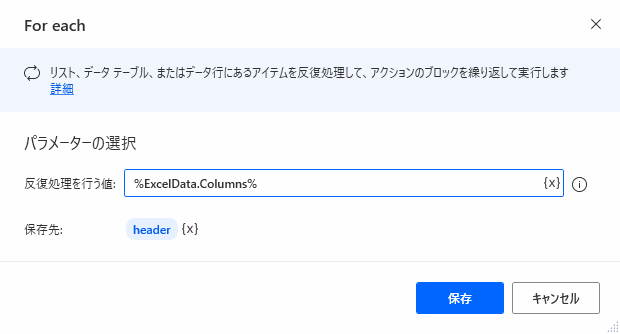
じょじお%ExcelData.Columns%はDatatableのプロパティでヘッダー(列名)を取得することができます。
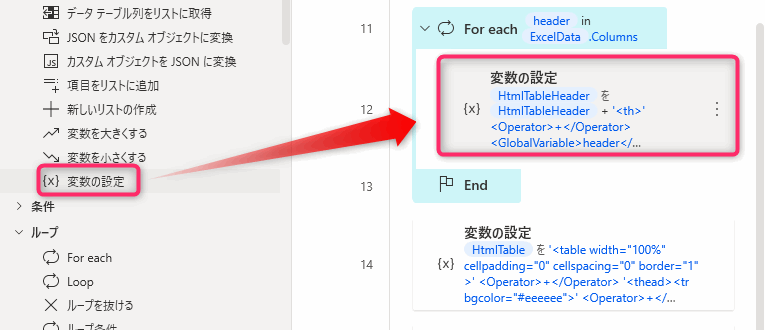

%HtmlTableHeader + '<th>' + header + '</th>'%
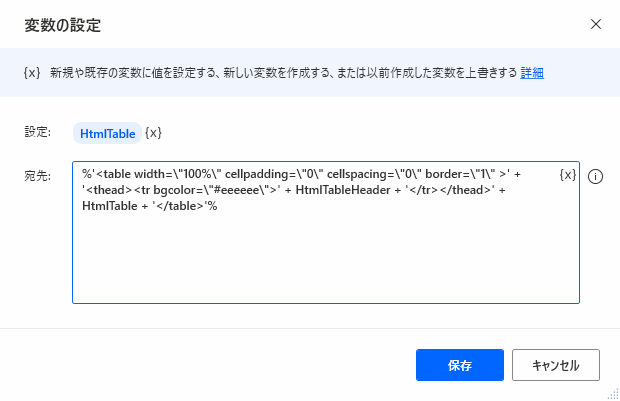
%'<table width=\"100%\" cellpadding=\"0\" cellspacing=\"0\" border=\"1\" >' + '<thead><tr bgcolor=\"#eeeeee\">' + HtmlTableHeader + '</tr></thead>' + HtmlTable + '</table>'%
ちょっとわかりずらいかと思いますが、HTMLテーブルをメールに渡す場合、CSSで装飾しておかないと表の枠線ですら描画してくれないのでwidth(表の幅)やBorder(枠線の太さ)、bgcolor(表の背景色)を指定しておかなければいけません。
例えばwidth=”100%”と指定するとき、PADでは文字列としてダブルクォーテーションを使用するときは\"100%\"のようにダブルクォーテーションの前にバックスラッシュ(あるいは¥マーク)を入力する必要があります。
 じょじお
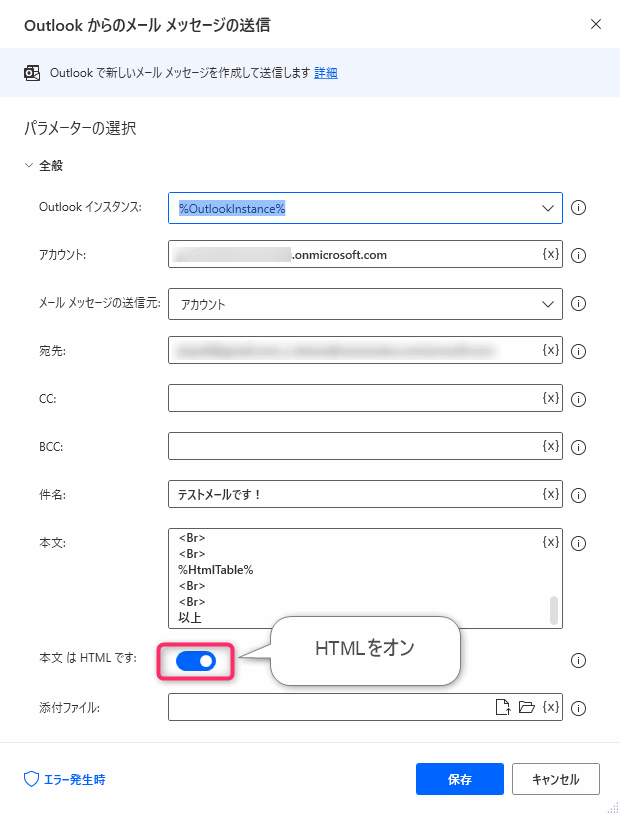
じょじおかならず「本文はHTMLです」のチェックをオンにしましょう。
〇〇株式会社
<Br>
山田 様
<Br>
<Br>
いつもお世話になっております!
<Br>
ダミーデータを送信します。何卒宜しくお願いいたします。
<Br>
<Br>
%HtmlTable%
<Br>
<Br>
以上
▲メール本文はこちらの内容にしました。
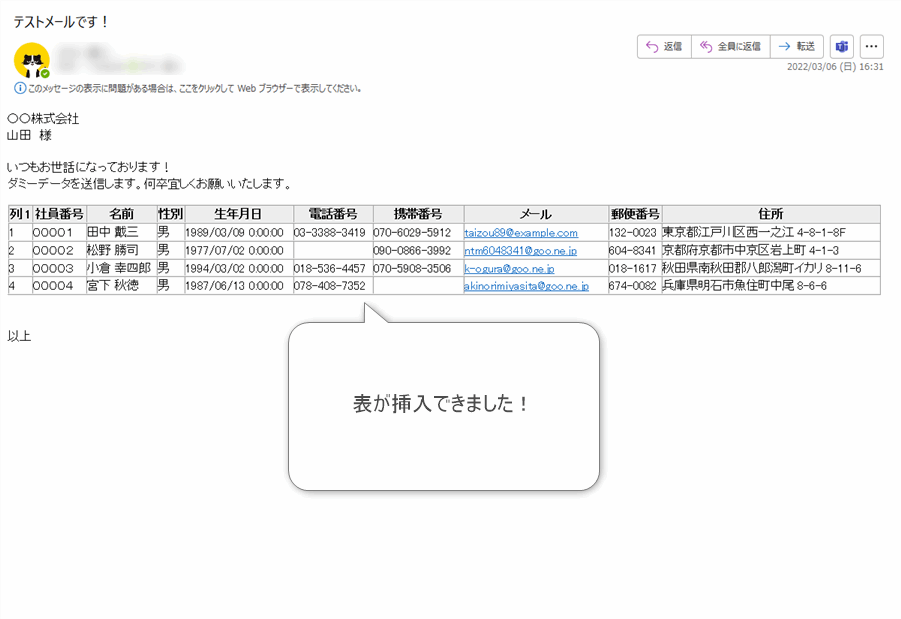
フローを実行すると表が挿入されたメールを確認できるかと思います。テストで自分自身のアドレスに送ってみてください。
tableタグに使っているbgcolorなどのパラメータを調整してみてください。
Excel.LaunchExcel.LaunchAndOpenUnderExistingProcess Path: $'''C:\\Users\\user\\Desktop\\dummydata.xlsx''' Visible: True ReadOnly: True Instance=> ExcelInstance
Excel.ReadFromExcel.ReadAllCells Instance: ExcelInstance ReadAsText: False FirstLineIsHeader: True RangeValue=> ExcelData
Excel.CloseExcel.Close Instance: ExcelInstance
LOOP FOREACH rowData IN ExcelData
LOOP FOREACH cellData IN rowData
SET HtmlTableRow TO HtmlTableRow + '<td>' + cellData + '</td>'
END
SET HtmlTable TO HtmlTable + '<tr>' + HtmlTableRow + '</tr>'
SET HtmlTableRow TO $'''%''%'''
END
LOOP FOREACH header IN ExcelData.Columns
SET HtmlTableHeader TO HtmlTableHeader + '<th>' + header + '</th>'
END
SET HtmlTable TO '<table width=\"100%\" cellpadding=\"0\" cellspacing=\"0\" border=\"1\" >' + '<thead><tr bgcolor=\"#eeeeee\">' + HtmlTableHeader + '</tr></thead>' + HtmlTable + '</table>'
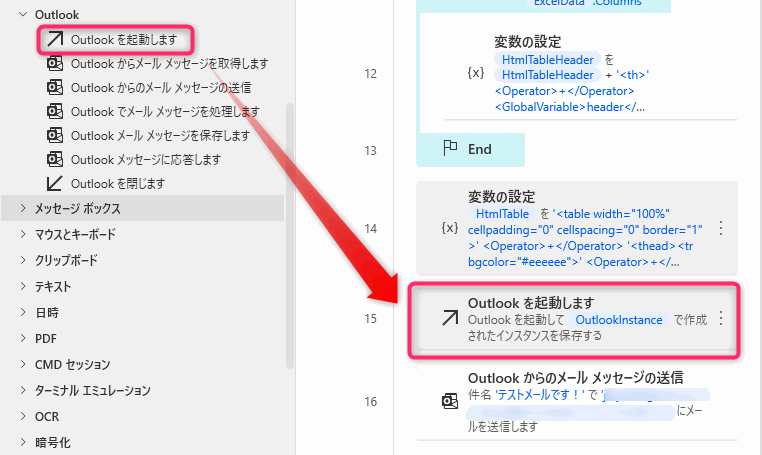
Outlook.Launch Instance=> OutlookInstance
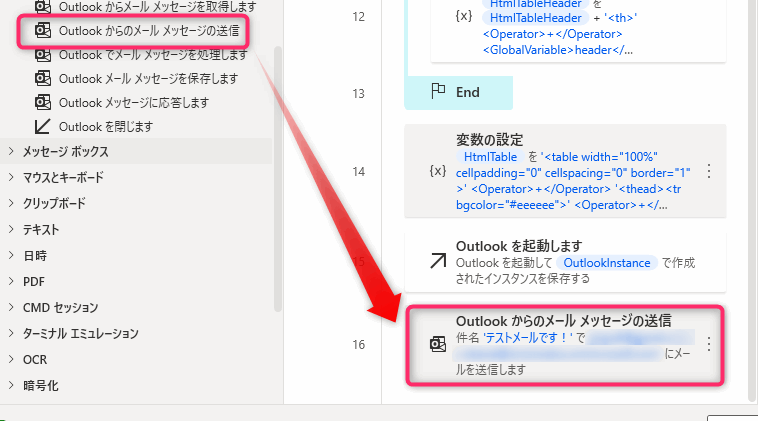
Outlook.SendEmailThroughOutlook.SendEmail Instance: OutlookInstance Account: `` SendTo: `` Subject: $'''テストメールです!''' Body: $'''〇〇株式会社
<Br>
山田 様
<Br>
<Br>
いつもお世話になっております!
<Br>
ダミーデータを送信します。何卒宜しくお願いいたします。
<Br>
<Br>
%HtmlTable%
<Br>
<Br>
以上''' IsBodyHtml: True
▲今回作成したフローのRobinソースコードです。Power Automate for desktopのフローデザイナーにこのまま貼り付けるとここで作成したフローを再現することができます。再利用するときはメールアドレスやExcelファイルなどのパラメータを調整して作成してください。
▲Excel表を挿入するときに、Excel表をそのまま挿入するのではなく行のフィルタをするときは上の記事が参考になるかと思います。


 じょじお
じょじお以上、Excel表データをメールに挿入する方法についてご紹介しました!
ぽこがみさまこのブログではRPA・ノーコードツール・VBA/GAS/Pythonを使った業務効率化などについて発信しています。
参考になりましたらブックマーク登録お願いします!
▲Kindleと紙媒体両方提供されています。デスクトップフロー、クラウドフロー両方の解説がある書籍です。解説の割合としてはデスクトップフロー7割・クラウドフロー3割程度の比率となっています。両者の概要をざっくり理解するのにオススメです。
▲Power Automate for Desktopの基本をしっかり学習するのにオススメです。この本の一番のメリットはデモWebシステム・デモ業務アプリを実際に使ってハンズオン形式で学習できる点です。本と同じシステム・アプリを使って学習できるので、本と自分の環境の違いによる「よく分からないエラー」で無駄に躓いて挫折してしまう可能性が低いです。この点でPower Automate for desktopの一冊目のテキストとしてオススメします。著者は日本屈指のRPAエンジニア集団である『ロボ研』さんです。
▲Power Automate クラウドフローの入門書です。初心者の方には図解も多く一番わかりやすいかと個人的に思っています。
Microsoft 365/ Power Automate / Power Platform / Google Apps Script…
▲Udemyで数少ないPower Automateクラウドフローを主題にした講座です。セール時は90%OFF(1200円~2000円弱)の価格になります。頻繁にセールを実施しているので絶対にセール時に購入してくださいね。満足がいかなければ返金保証制度がありますので安心してご購入いただけます。


